Train Every Movement Pattern with Offset Angles
Dr. Joel Seedman, Ph.D.
When it comes to training my athletes and clients as well as myself, approximately 80% of the movements we use are fairly basic and traditional while the other 20% involve unique variations. One unique training method I periodically use is offset training and variations thereof. This is something I’ve written about multiple times in various articles highlighting a number of different offset loading protocols including the offset barbell loading method, offset leverage, offset elevation, dumbbell offset loading, continuously adjusting offset loading, and more.
However, one method I’ve recently been using to further enhance the offset loading training stimulus is offset angled training. The concept is quite simple as it involves performing movements using an angled slope or slanted surface. This is most easily done using either a decline bench or a small slope/ramp or anything else that provides an offset angle. Although this method looks quite unusual, offset angled training has many unique attributes and applications. Here are some of my favorite ways to incorporate offset angled training into your routine.
Offset Angle Decline Chest Presses
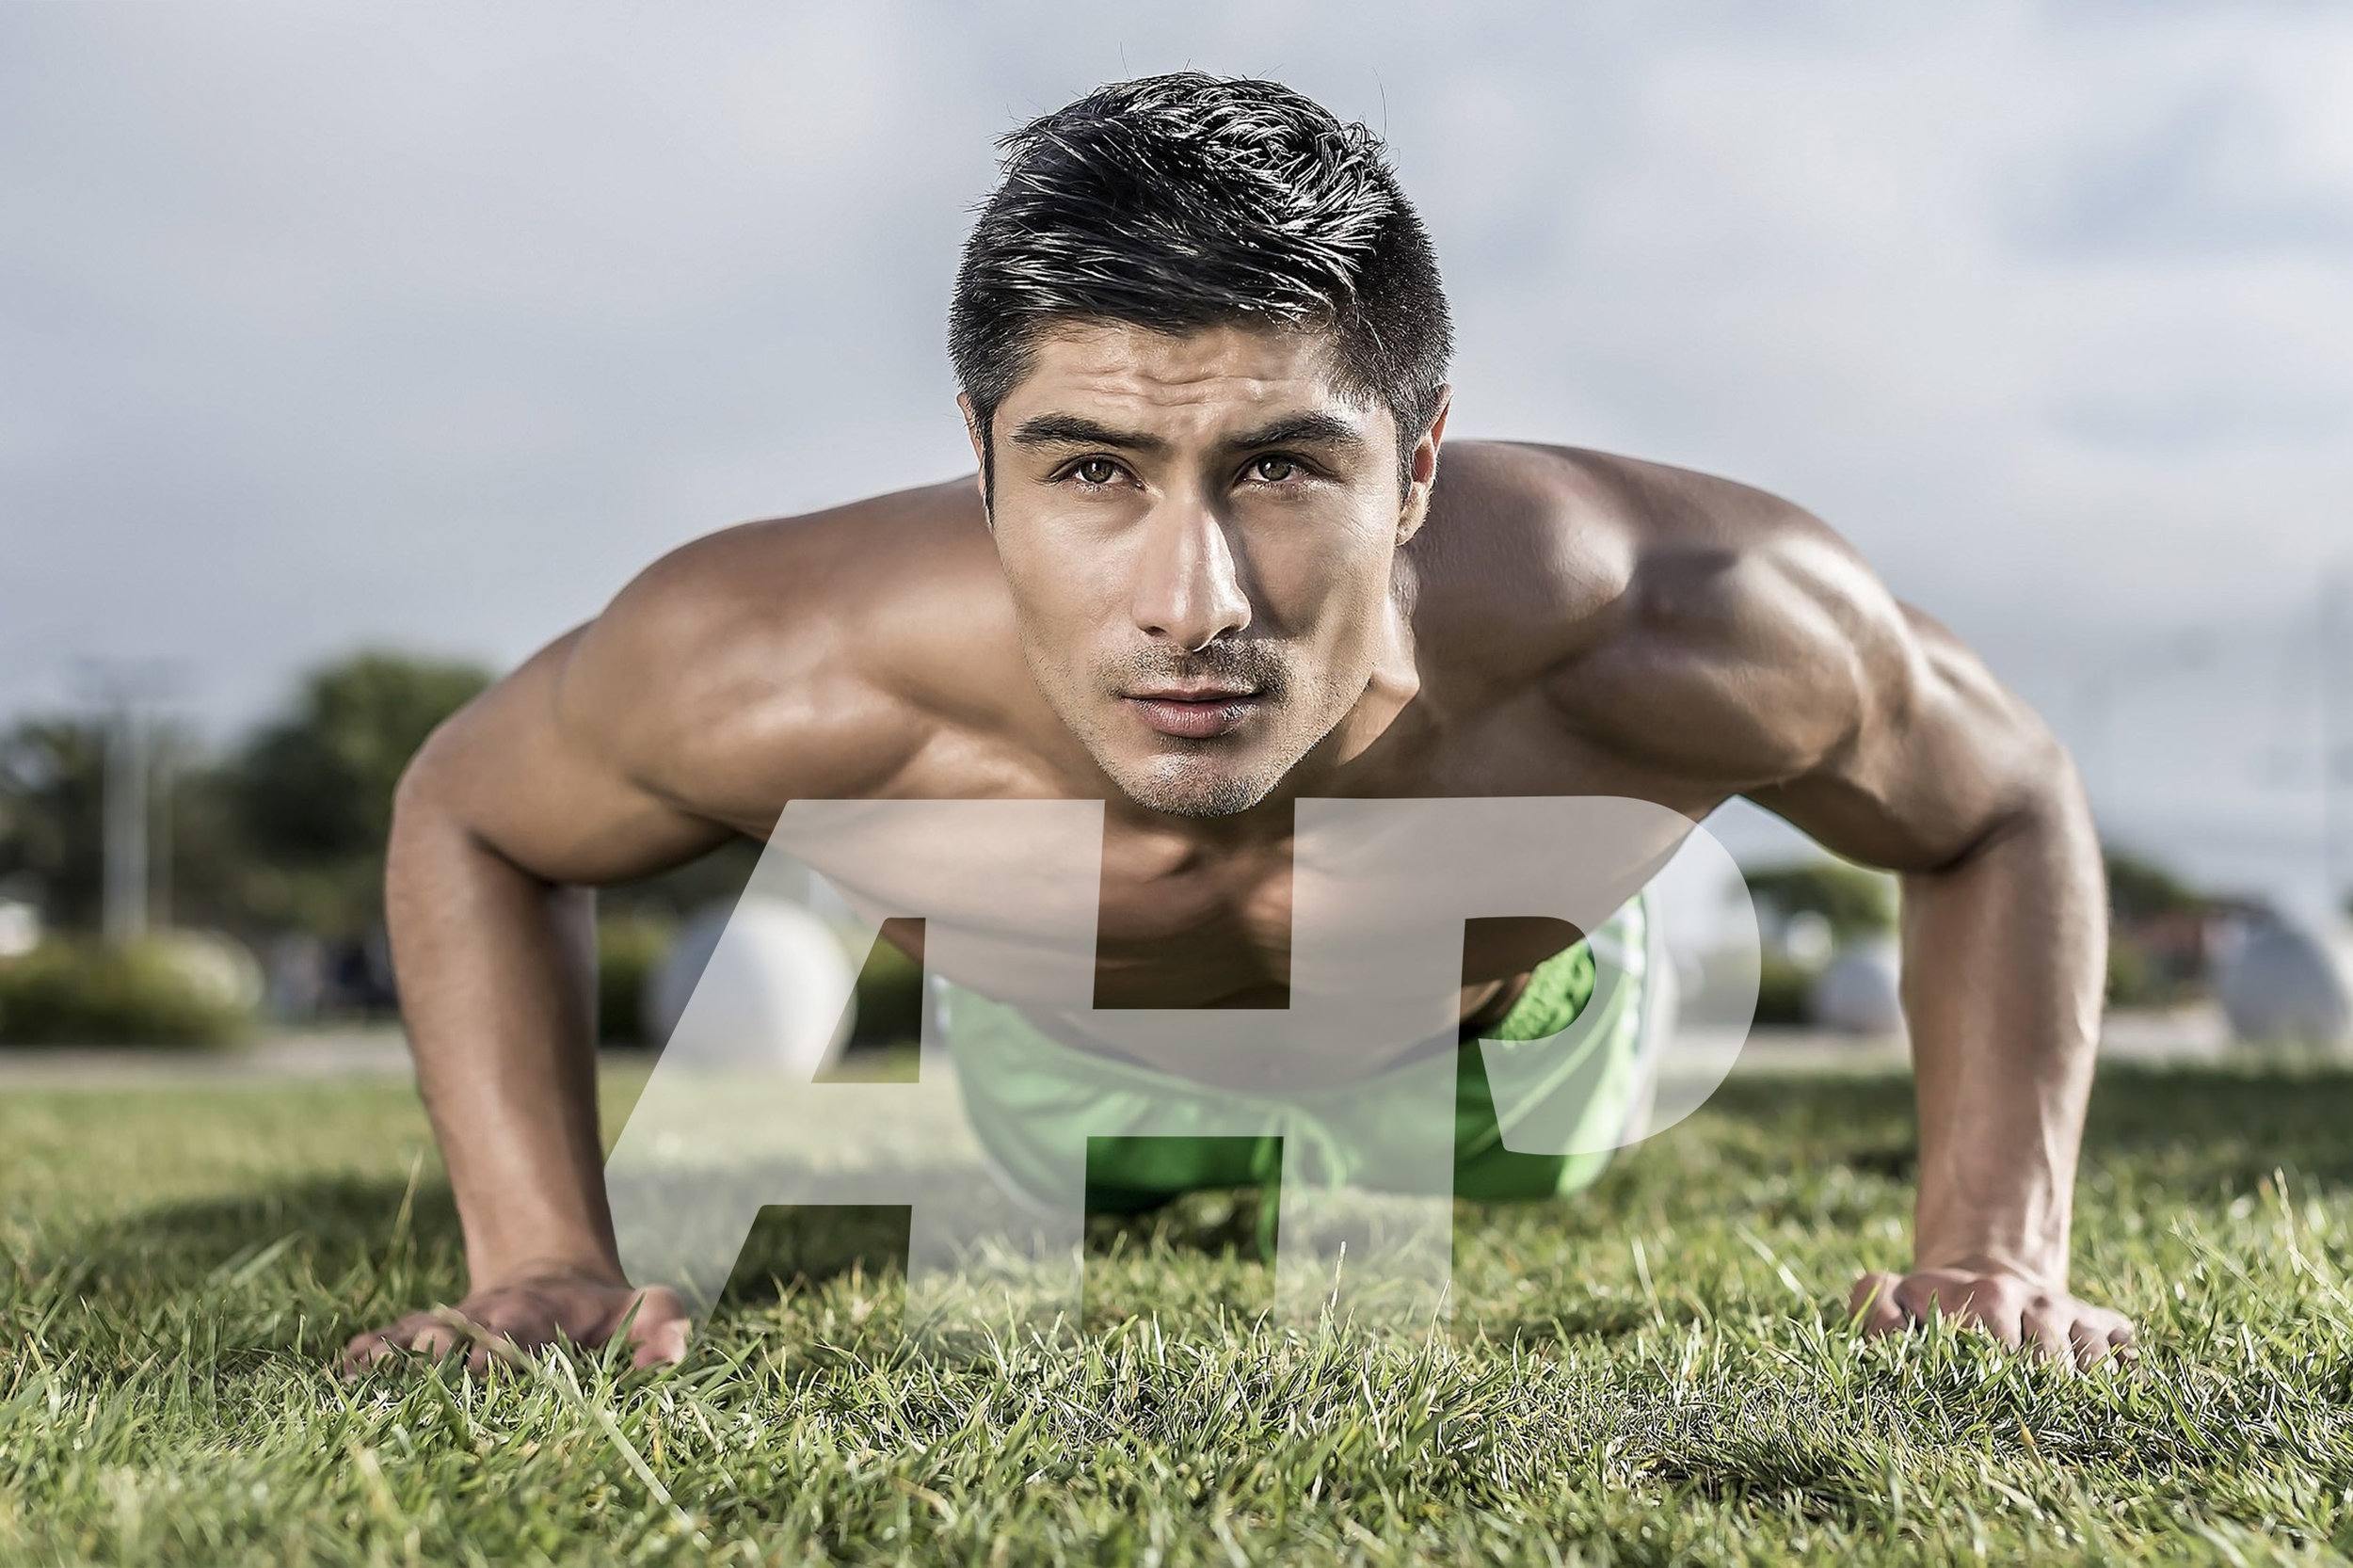
One of my favorite movement patterns to incorporate offset angle training on is horizontal chest presses. These represent the epitome of full body chest pressing exercises as every muscle from head to toe will need to be recruited to successfully complete these. Simply lay on a decline bench in t-bench setup with the bench set at approximately 20 degrees and perform any of your favorite chest presses including dumbbell and barbell presses. Here I have several of my clients and athletes including Todd Weiland, Leslie Petch, and NFL cornerback Prince Iworah performing some of my favorite variations.
There are 4 factors that make these movements so effective.
First, the degree of anti-rotation, core stabilization, and rotary stability required is through the roof as your body literally wants to twist, rotate, and shift off the bench. In order to maintain your body position and resist these rotational forces, your entire core and abdominal musculature will be required to aggressively fire throughout the duration of the set particularly in the bottom stretched position of the chest press.
Second, not only does the offset angle position produce rotational forces on the torso and spine but it also produces a strong abduction force on the shoulder (of the side that’s lowest on the bench). As a result the lifter inevitably feels as though they’re performing a combination chest press and isometric chest fly as they’re resisting abduction forces throughout the set by aggressively contracting their chest via shoulder adduction.
Third, the level of posterior chain recruitment and hip activation needed to maintain proper body positioning is exceptionally high during offset angled decline presses. In fact, you'll notice that your core, hips, and even your feet and ankles must work together to resist rotational forces and keep your body fixed on the bench. In fact, I’ve had several athletes express how they nearly experienced cramping in their glutes, hips, and feet when performing these due to the intense activation needed during these exercises.
Fourth and lastly, the level of full body tension needed to dial these in are inordinately high. Once you return to traditional bench pressing exercises not only will they feel exceptionally easy in comparison but you’ll most likely notice you can handle substantially heavier loads due to your improved ability to tighten up your whole body and eliminate energy leaks.
Offset Angle Renegade Rows
Renegade rows are one of my favorite combination upper back and core exercises. Unfortunately many individuals perform them with excessive rotation, twisting, and shifting of their torso. While a very slight degree of rotation is acceptable when rowing the weight into the top position as this can produce a stronger contraction through the back, excessive twisting simply minimizes tension to the core not to mention to the upper back and lats. Although there are several ways to eliminate this (i.e. placing a plate or a dowel on the person’s back) such as during the table top variations another incredibly effective method is the offset angled protocol. Simply place your feet on 20-35 degree angled decline bench and perform renegade rows as demonstrated by my awesome client and national level figure athlete Leslie Petch.
Essentially this position is creating additional rotational forces on the torso and rowing arm. Not only does this light the core up more so than just about any movement you’ll ever perform but it also prevents excessive rotation and twisting. For example if you’re rowing your right arm, the natural tendency is to twist and rotate the right side of the torso up towards the ceiling. However, the offset angled position prevents this as the right side of the torso is being pushed aggressively towards the floor throughout the set.
Don’t be surprised if you have to substantially decrease the amount of weight you typically handle during renegade rows. In fact I suggest starting with single arm planks using the offset angled decline bench before progressing to these constant tension renegade rows. And yes, keeping the weight elevated throughout the set rather than allowing it to touch the floor is the optimal method for performing any renegade row as it provides constant tension to the core and upper back.
Offset Angle Squats
As many of you know I’ve written several articles in the past about offset squats as they’re incredibly effective for enhancing lower body mechanics and improving the squat pattern. I’ve also posted several pieces related to the offset elevation squat as these provide a slightly different yet just as effective a training stimulus. Although it provides a similar effect as the offset elevation method, performing squats using the offset angled method further increases the demands of this protocol. In fact, this method can be applied to any standing exercise including squats, bent over rows, overhead presses, hip hinges, and more.
Here I have one of my awesome clients Matt Jordan demonstrating it using the goblet squat. While this is something I would only periodically incorporate with an athlete, using this once every several weeks can definitely provide a unique stimulus to improve their squat pattern. With that said there are 5 reasons that make this so effective.
1. The offset angled squat requires intense core activation which many individuals struggle with during their squats. If you have trouble feeling your core fire during squats and bracing your abs, these will immediately remedy that.
2. These provide an intense training stimulus to the feet and ankles as one side is resisting pronation while the other is resisting supination. In fact, many of my clients mention how their feet and ankles nearly cramp when performing these. If you have trouble screwing your feet into the floor when squatting or doing any standing exercise, the offset angled method is a sure fix.
3. The offset angled squat is one of the most effective squats for reinforcing proper squat depth and eliminating collapsing at the bottom. Because of the semi-awkward nature of the offset elevation, it feels incredibly awkward and unnatural to use excessive depth. If you have trouble finding your optimal 90 degree or parallel squat position (which represents optimal squat depth for any human) you’ll want to give these a go.
4. As asymmetrical as it is, the offset angled squat is one of the best drills to help address asymmetries and weakness as it’s essentially feeding dysfunction and asymmetrical position similar to reactive neuromuscular training with bands (RNT training).
5. Offset angled squats are one of the most effective drills I’ve used for teaching the lifter to set the hips back. That’s because in order to create a stable and comfortable position with the offset position, the hips (especially on the elevated side) will have to hinge back.
Offset Angle Pushups
Performing pushups with one hand either on a medicine ball or on a small box are both great options when it comes to offset position pushups. However, if you’re looking to take the offset intensity a step further try performing pushups using the offset angled method by placing your hands a decline bench. Here’s one of my awesome clients Leslie Petch showing how it’s done while also elevating her legs for even greater intensity.
Similar to the other offset pushups previously mentioned your torso will want to tilt and shift to one side. However, now with the offset angled position we’re also increasing the rotational forces acting on your body that you’ll have to resist by firing the daylights out of your core. Although it may seem like a small adjustment, placing the hands on an angled surface doesn’t just create an offset height. In reality the slight tilting/angling of the hands and arms produced from the offset angle produces exponentially greater rotational forces on the entire body than simply elevating them on two flat surfaces.
In addition, the amount of tension placed on the arm that’s lower on the bench is unusually high making these feel somewhat similar to a single arm pushups. Don’t be surprised if you feel the pressing muscles (chest, shoulders, and triceps) on that lower side get pummeled as you stabilize your body while performing these anti-rotational pushups. However, as with any offset pushup the goal is to perform them in as symmetrical a fashion as possible although one side will undoubtedly be more taxed. As an added bonus these offset angled pushups do wonders for cleaning up pushup mechanics as well as eliminating imbalances and asymmetries in the body. Try performing several sets of 4-6 reps per side during your next upper body session. Don’t be surprised if your upper body strength as well as core stability get an added boost in performance during subsequent workouts.
Offset Angle Plyometric Pushups
The offset angle method can also be applied to explosive plyometric pushups as I have NFL athlete & Atlanta Falcons player Julian Williams performing here.
Many athletes struggle to keep their core and abs engaged while producing and absorbing high-level forces such as during plyometric pushups as the impact tends to destabilize their spine and hips. The offset-angle technique helps remedy this issue as it requires the athlete to dial in their core and maximize spinal rigidity as a means of resisting rotational forces produced from the offset angle. As a result they not only produce safer mechanics but they also produce & absorb force and impact more efficiently due to enhanced osteokinematics.
Offset Anti-Rolling Pushups
The offset pushup protocol can also be effectively applied to the anti-rolling protocol as shown here by MLB pro baseball player Austin Meadows.
The Anti-rolling barbell component blasts the core and eliminates the sagging hip syndrome as it reinforces a tall hip and hollowed core position otherwise the barbell will away from you. Additionally, the extension forces also act directly acting on the scapula & shoulder stabilizers. If you don’t fully depress & retract your shoulder blades the bar will literally pull out and away from you leaving you plastered to the floor. This really teaches the lifter how to pack & centrate their shoulders during pushups. When combined with the offset angle protocol the stimulus to the core is through the roof. Read more about anti-rolling barbell pushups here.
Offset Angle Pullups and Chinups
Several months ago I wrote a blog post about performing offset pullups. However the same protocol can be applied using the offset angled method
To apply the offset angled protocol to pullups and inverted rows, simply place a barbell on top of a squat rack that has safety pins set to staggered heights. Here I have two of my NFL combine athletes Julian Williams and Bryce Canady showing how it’s done.
On a side note you’ll notice they use a slightly more compact range of motion during these as attempting to use too large of an ROM can pull the body excessively out of alignment particularly in the shoulders and scapular regions. In fact, this is a common quality amongst many offset position exercises as a more compact ROM is typically ideal to maintain proper alignment and spinal positioning. With that said the there are several unique benefits of this offset angled method when it comes to pullups and chin-ups
1. As asymmetrical as the movement is, the offset angled pullup actually helps address asymmetries and weaknesses. That’s because you’re pulling slightly more with the higher arm, making it somewhat similar to a single arm pulldown or single arm pullup. However the lifter should still try to pull as equally as possible with both sides of their body and avoid moving into an overly asymmetrical position. With that said, don’t be surprised if one side is significantly more difficult.
2. When it comes to dialing in your pullup and chin-up form, learning to engage the core is always a surefire way to produce immediate improvements in form. Offset angled pullups force the lifter to activate their core to a greater degree as a means of stabilizing the movement and resisting rotational forces and lateral flexion forces. In other words if the core gets loose the body will actually twist and rotate due to the asymmetrical position.
3. The offset elevation pullup requires the lifter to use stricter, slower, and smoother pulling mechanics inevitably leading to greater metabolic stress, mechanical tension, and muscle damage. As a result they’re incredibly effective as a functional hypertrophy exercise not only for the entire upper back and lats but also the biceps and forearms.
4. One of the first things my athletes will mention on offset angled pullups is how much they feel their forearms and grip are getting worked. That’s because the offset position requires greater full body tension which inevitably produces increased grip activation and forearm recruitment. In addition, the barbell itself has a tendency to roll on the pins creating even greater stress to the girp and forearms. Each of these grip-related components leads to greater concurrent activation potentiation and irradiation thereby producing increased neural drive and motor control throughout the kinetic chain.
Offset Angle Decline Single Leg Stand
Foot and ankle training is perhaps the single most neglected component of fitness and performance training. Without proper foot and ankle mechanics it’s impossible to perform any lower body movement correctly. With that said if you haven’t checked out my Ultimate Foot and Ankle Manual I highly recommend it. This particular drill demonstrated in the video by NFL athlete Blake Simms showcases one of dozens of videos and exercises I include in the Ultimate Foot and Ankle book.
To perform this drill simply perform single leg stands laterally on a decline bench similar to the other offset angled protocols described above. Although you can perform these linearly either on an incline (having your toes toward the lower end of the bench which helps activate the muscles around the toes), or on a decline (with the toes towards the higher portion of the bench which stretches the calves and Achilles more), performing them in a lateral angled fashion as shown by Blake provides other unique benefits.
More specifically it helps hone in on various foot issues such as pronation, flat feet, and supination by feeding dysfunction. For instance, for individuals with ankle pronation and flat feet, standing laterally on the bench so that the inside or medial portion/inside of the foot is on the decline/lower portion of the bench) is recommended. In essence this feeds dysfunction as the angled position is attempting to push the individual into even greater pronation. As a result the person will have to resist this to a greater extent by relying on the muscles responsible for supination. This is a great drill for restoring the natural arch of the foot.
For individuals with ankle supination and overly high arches as well as lack of big toe activation, the drill would be performed in the opposite fashion so that the outside or lateral portion of the foot is on the decline/lower portion of the bench). In essence this feeds dysfunction as the angled position is attempting to push the individual into even greater supination. As a result the person will have to resist this to a greater extent by relying on the muscles responsible for pronation and pushing to the inside of their foot. This is also a great drill for teaching individuals to activate their big toes which is critical for proper foot and ankle mechanics.
If the athlete does not seem to display excessive levels of either pronation or supination but simply needs general strengthening of the feet, then both versions of the drill would be performed just as I’m having Blake do in the video. To increase the difficulty, try performing these with an exercise matt or with eyes closed or both. Hold for 20-45 seconds in each position.
Offset Angled Single Leg Exercises
It should also be pointed out that the offset angle method can also be applied in a similar fashion to other single leg exercises such as single leg RDL’s, single leg squats, split squats, and lunges.
In fact, for individuals who struggle with various forms of lower body dysfunction such as valgus collapse, ankle pronation, excessive external rotation of the hips (bow legged syndrome), ankle supination, or general instability in the lower body, these variations are incredibly effective for addressing them.
If you’re looking for a program that teaches you how to incorporate unique movements such as these into your routine, check out my Complete Templates Series.