Master The Single Leg RDL and Unilateral Hip Hinge
Dr. Joel Seedman, Ph.D.
Mastering the single leg hip hinge is something I consider pivotal for maximizing athletic performance, muscle function, and movement mechanics. Unfortunately it’s also one of the most butchered movement patterns there is as many trainers, athletes and coaches perform it incorrectly.
The best exercise I’ve found for perfecting the single leg hip hinge is the eccentric isometric single leg RDL.
When implemented properly it’s the quickest and most effective way to learn the unilateral hip hinge pattern. In this video I’m coaching a brand new group of NFL Combine athletes on the proper execution of the single leg RDL as we prepare their bodies for their upcoming testing dates.
No, their technique’s not perfect but it’s their first time going through the movement with proper instruction and less than 5 minutes of practice. So yes, you can become moderately efficient at the movement within several minutes of proper cueing and coaching. However to master the single leg hip hinge typically takes 6-8 weeks.
So is it worth your time and effort to perfect the single leg RDL? The answer is 100% yes as the physical improvements are well worth the time investment. With that said here are 10 important cues that are necessary for mastering the single leg RDL.
1. Go barefoot or use minimalist shoes. As you’ll notice in the video most of the athletes aren’t wearing shoes. Besides targeting the glutes and hamstrings, one of the most underrated benefits of the single leg RDL is the impact it has on foot and ankle strength. In fact the single leg RDL is as much of a balance and stabilization drill as it is a hip strengthening exercise. Wearing shoes blunts this response as most traditional footwear acts as a crutch, by providing excessive support which allows the muscles of the feet and ankles to relax.
Once you eliminate the shoes not only will you eventually find the single leg RDL much easier to control, the increased activation of the feet and ankles will enhance neural drive and motor unit recruitment all the way up the kinetic chain. As a result you’ll experience greater engagement of your entire posterior chain (glutes and hamstrings) as well as your core musculature and spinal stabilizers.
Don’t be surprised however, if the single leg RDL is more difficult in barefoot conditions your first several times through as most individuals are accustomed to having their bulky footwear assist them. As your feet and ankles get stronger and more stable from functioning in barefoot conditions, balance will markedly improve and the single leg RDL will become much more locked in. If you really want to challenge your ankles as well as your upper back try throwing several rows during each eccentric isometric RDL as I explain in this video.
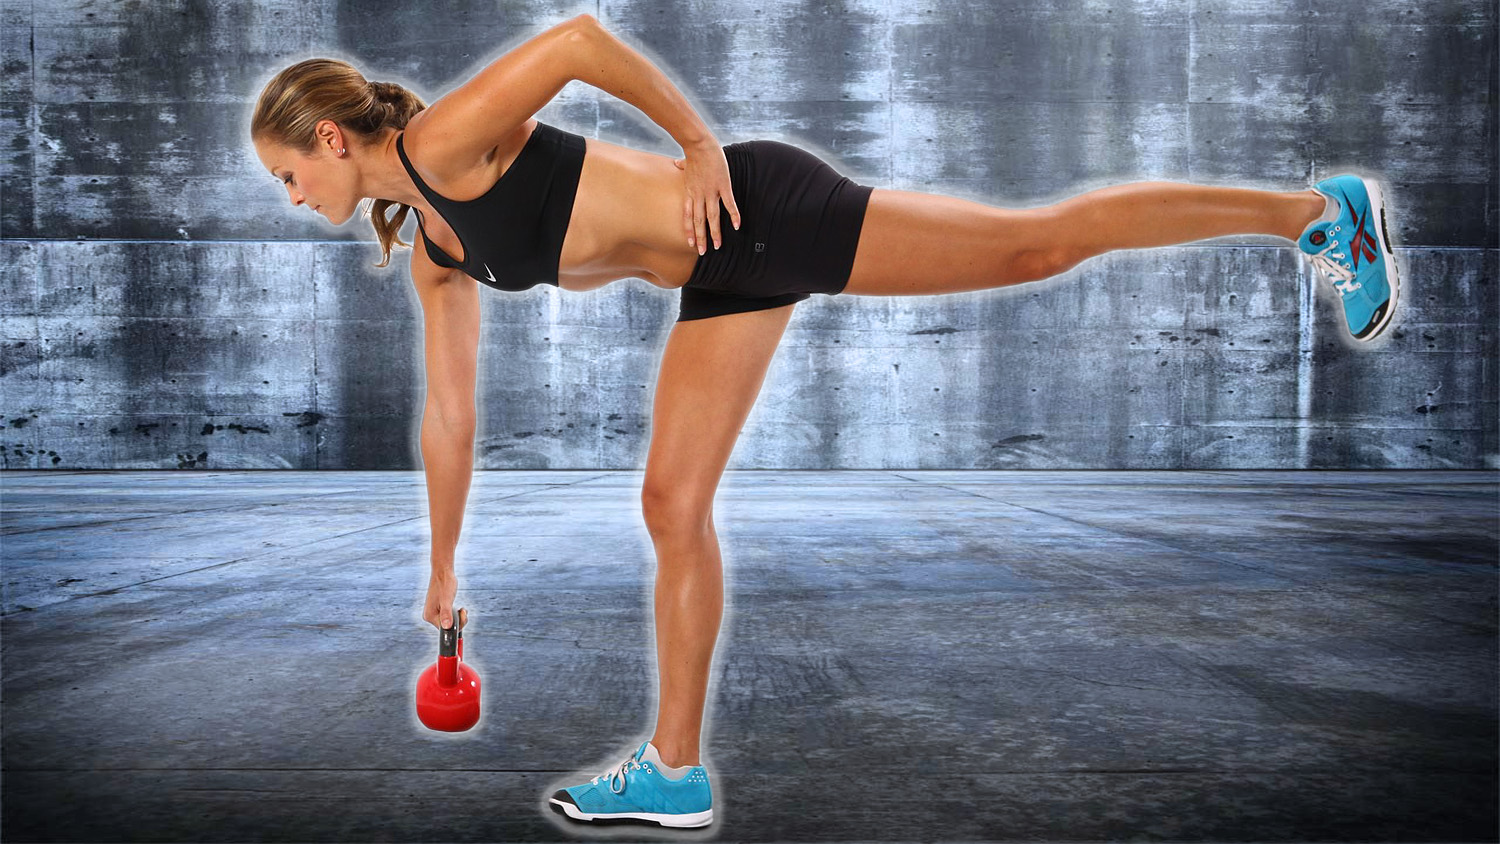
2. Maintain a soft knee position on the support leg. One of the most common mistakes I see during single leg RDL’s is using an overly straight leg position on the support leg (the leg that’s in contact with the ground). As with any RDL or hip hinge, the support leg needs to maintain a slight knee bend or “soft knee” position (10-20 degrees of knee bend). When the support leg is overly straight (similar to a stiff leg deadlift position), this places undue stress on the lower hamstring insertion and tendon making the lifter vulnerable to tears and hamstring injuries as well as sciatic issues.
In addition it minimizes the degree of activation to the larger glute muscles. Keeping a soft knee position allows the larger muscles of both the glutes and the hamstrings to be targeted maximally. It’s also the biomechanically safest and strongest position, representing the ideal position for optimizing movement mechanics and muscle function. Just ask any athlete to perform a single leg jump or hop, and watch the similar degree of knee bend. A straight leg position may look cool but it’s highly dysfunctional and unnatural
3. Bend the elevated leg to approximately 90 degrees. Another topic of controversy related to the single leg hip hinge is the position of the back knee/elevated leg. Rather than keeping the back leg relatively straight, as most coaches would suggest, I recommend the athlete maintain a 90-degree bend throughout the movement during most scenarios although there are a few exceptions that will be discussed towards the end of the article. Here’s why using the 90 degree bent leg position is important in most scenarios.
When performing the single leg hip hinge the movement needs to promote optimal movement mechanics and functional activation patterns. Keeping the elevated leg bent to approximately 90 degrees does just that. Here’s why:
When performing the eccentric phase of the movement, the elevated leg needs to have heightened levels of glute and hamstring activation. This promotes increased elongation and stretching of that hip flexor and contralateral shortening/contraction of the hip flexor of the opposite/support leg. Keeping the elevated leg overly straight does not allow optimal elongation of the hip flexor in that leg thereby minimizing the stretch in that hip flexor and co-contraction of the hip flexor and glute in the opposite support leg. In addition the 90 degree bent leg cue helps to promote a softer knee position on the support leg, which as previously described is critical during the single leg RDL not only for injury prevention but for activation and force production/absorption.

Proper Single Leg RDL with soft knee in support leg and 90 degree bend in elevated leg
The 90-degree bend in the elevated leg also plays a critical role during the concentric phase of the movement. When the back leg is overly straight during the concentric/lifting phase, the athlete will experience decreased power and force production due to poor leverage. That’s because contraction of the hip flexors of the elevated leg (during the concentric/drive phase) helps promote increased activation of the hip extensors in the support leg. When driving back up into the top starting position of the single leg hinge, the lifter should be focused on driving the knee of the elevated leg forward, aggressively to maximize force and power similar to how an athlete jumps. This activates the hip extensors in the support leg as the lifter performs the concentric phase of the exercise.
Faulty single leg RDL position with overly-straight legs
This will typically involve a 90-degree knee bend in the elevated leg. That’s because this is often the most natural way to activate the hip flexors and produce torque as well as produce contralateral glute activation in the opposite leg whether its during jumping, running, or landing. This is also very similar to how an MMA fighter would knee an opponent by firing the hip flexor from a 90 degree position as this represents optimal leverage and body mechanics for producing and absorbing force. Driving back up to the starting position from a straight leg position will require greater time and decrease force production and power output.
Finally, maintaining a 90-degree bend in the back leg throughout the single leg hip hinge keeps the distal portion of the leg closer to the center of mass thereby aiding in stability, balance, and leverage.
4. Don’t use an excessively large range of motion. This goes hand in hand with the above points regarding a straight leg position. Rather than aiming for maximal range of motion and excessive stretch, the goal should be optimal range of motion with the torso just slightly above parallel to the floor. Going significantly lower than this promotes hamstring tears and pulls, low back issues, and decreased force production.
Similar to the other points, no properly trained athlete would ever jump or land or perform any functional activity with a torso position below the parallel position. Training the single leg RDL with an extreme range of motion only reinforces faulty movement patterns into your central nervous system that can degrade natural body mechanics and athletic performance. In addition it decreases stress to the working muscles thereby negating the strength and hypertrophy stimulus of the exercise.
5. Keep a rigid spine by engaging your lats and pinning the shoulders back. This goes hand in hand with the topic of avoiding exaggerated range of motion. In fact when the spine is set into the proper position by maintaining a natural arch (not an excessive arch), with a tight core, and tall head, it’s nearly impossible to collapse and go excessively deep. In contrast when the spine is not rigid, an overly large ROM will almost always inevitably follow as the body structure and function is compromised both biomechanically (leverage is not optimized) and neurophysiologically (there will be short-circuiting of neural signals).
6. Don’t let the elevated leg or the weights touch the floor throughout the set. Most individuals perform single leg RDL’s by allowing either the weight or their elevated leg to touch the floor each repetition as a means of providing support and balance. This greatly reduces the activation of the stabilizers in the lower body and feet and negates many of the benefits associated with the single leg hip hinge. Although this can occasionally be remedied by a simple coaching/cuing fix (telling the athlete to not touch the floor), it’s often an indication that the athlete lacks the balance and stability to perform the movement unsupported.
With this in mind performing the single leg RDL unsupported is even more important as it will help to remedy these subtle but significant forms of dysfunction and instability. Here’s one of my athletes Leslie Petch demonstrating a proper yet very difficult non-supported single leg RDL variation.
7. Dorsiflex the back foot and ankle throughout the movement. Dorsiflexion is one of the most neglected and underrated aspects of human biomechanics. When the feet and ankles are dorsiflexed this helps produce better activation and signaling to the ankles, calves, glutes, and hamstrings thereby allowing better spinal alignment up the kinetic chain. As a result it's more conducive for maintaining a neutral arch and t-spine extension, which is critical for maintaining balance and avoiding a collapsed position. It also helps to promote irradiation and concurrent activation potentiation thereby eliminating energy leaks throughout the body. In essence there should be a 90-degree position in the elevated foot and ankle complex throughout the movement.
8. Use the eccentric isometric protocol. When it comes to mastering any movement particularly something as difficult and complex as the RDL, the name of the game is motor control, proprioception, and kinesthetic awareness. To maximize these factors it’s best to perform the single leg RDL in an eccentric isometric fashion (slow negative followed by a several second pause in the stretched position). This will allow the lifter to use the somatosensory feedback produced from the muscles to fine-tune his or her body position and make the necessary adjustments previously discussed to lock the movement in.
In essence each of the various technique cues described above will be exponentially more feasible to implement and master when combined with the eccentric isometric variation of the RDL. In fact it will be almost impossible to master the single leg RDL without implementing the eccentric isometric protocol. In addition, for those reading this who still aren’t sold on the form and technique cues previously described, performing the single leg RDL in an eccentric isometric fashion will be the single most convincing factor. That’s because it will be nearly impossible to perform a controlled single leg unsupported eccentric isometric RDL unless all of the aforementioned cues are implemented precisely as explained.
Ironically to maintain balance and any semblance of motor control with significant loads, you’ll notice your body naturally gravitates towards the very cues and technique pointers previously described. That’s because eccentric isometrics force the body to rely on the most natural and biomechanically sound positions for any movement pattern as anything less will make it almost impossible to successfully complete the movement.
9. Don’t use the mirror. Using a mirror while performing a single leg RDL is one of the worst training practices you could implement when attempting to master the unilateral hip hinge. That’s because it keeps you from adhering to the somatosensory feedback and proprioception that you’ll desperately need to attend to if you’re going to control your body position and stabilize the movement. Whenever you use the mirror, the image from the mirror reflects back to your retina and gets processed by your occipital lobe before the brain cognitively compares this image with the desired outcome, which requires further processing.
Cerebellar coordination of movement modification in response to the visual and cognitive processing steps described above can take 200-500 milliseconds, which is roughly 8-10x longer than it takes proprioceptive mechanisms such as muscle spindles to respond (30-50ms). If you use the mirror to make corrections to your single leg RDL, by the time you’ve made the adjustments, the error (most likely a loss of balance and stability) will have already transpired. In contrast if you rely on muscle sensory receptors these mechanisms can detect potential errors before significant movement deviations occur thereby assisting your body mechanics, balance, and stability. This will be even more evident when performing the unilateral hip hinge in an eccentric isometric fashion due to the enhanced proprioceptive feedback. Just like any other movement, perform the single leg RDL by feel, not by sight.
10. Practice the single leg hip hinge frequently. Like any skill, frequent practice is an essential part of mastering that activity. Because the single leg RDL is so complex and involves such a high degree of sensory-integrated movement and motor control you’ll want to practice the single leg RDL daily. This can be done with no additional loads other than bodyweight.
What To Expect
Once you re-educate your nervous system and reinforce the proper single leg hip hinge blueprints into your CNS you can expect a multitude of physiological improvements. These include increased strength, mobility, stability, balance, motor control, posture, breathing patterns, power, symmetrical loading, and coordination throughout the body. You can also expect improvements in your squat, deadlift, vertical jump, broad jump, running speed, and agility. Your joints including your knees, low back, hips, ankles, and feet will also receive an added boost as much of the inflammation to these areas will greatly subside.
In addition you’ll most likely eliminate a significant portion of dysfunction in the foot and ankle region. Any pronation, supination, or general weakness in the foot and ankle complex will result in the lifter immediately losing his or her balance, which he or she will be forced address within seconds in order to successfully perform the exercise.
On a side note, the technique outlined in this article applies to any single leg hip hinge including a single leg RDL, single leg good morning, or single leg swing. The only factor that changes is the loading parameters. The body mechanics remain nearly identical from each unilateral hinge to the next.
Quick Tip
A cool strategy I'll periodically incorporate with my athletes to enhance single leg hip hinge mechanics (almost immediately) is the plate pinch protocol as shown here by Pittsburg Pirates Austin Meadows.
The bumper plate pinch protocol not only helps to enhance grip and forearms strength but it actually helps produce greater irradiation and concurrent activation potentiation (enhanced neural drive) throughout the kinetic chain). As a result you'll noticed increased core activation, spinal rigidity, and crisp, controlled movements throughout the exercise. I not only use this technique to help teach individuals how to lock in their single leg hip hinge but also their single leg squat and lunge as they’ll have improved balance and motor control as they squeeze their grip. This same technique can also be used with the dumbbell pinching method using hex dumbbells.
Assessing The Single Leg RDL
At this point you may be asking how one determines if he or she has mastered the single leg RDL. There are 6 tests to determine this, all of which would need to be successfully completed before earning your pro card for the single leg hip hinge.
1. The lifter should be able to perform several strict eccentric isometric single leg RDL’s with a load equivalent to his or her bodyweight. In other words a 200 pound individual would need to be able to handle a 200 pound barbell, trap bar, or 100 pound dumbbells.
Once the athlete has mastered the single leg RDL, they should also be able to perform rows from this position with a load equivalent to bodyweight as I show here with 2 advanced variations.
2. The athlete should be capable of performing several eccentric isometric bodyweight RDL’s (no additional loads) under eyes closed conditions without losing his or her balance throughout. Even without any additional weight this is much more challenging than it sounds.
3. The lifter should be capable of performing several single leg good mornings in an eccentric isometric fashion on each leg with perfect form.
4. The lifter should be capable of completing several bent over rows with at least half of their bodyweight while holding a single leg hip hinge position.
5. The athlete should be capable of performing single leg plate swings with a total load of at least 1/3 of his or her bodyweight for 10 strict reps on each leg.
6. The individual should be capable of performing stride-simulated plyometric hinges in a consistent and repeated fashion while maintaining body control, balance, a stability.
Just to re-emphasize the importance of technique, each of these tests will feel nearly impossible unless the aforementioned 10 cues are precisely implemented. However, once you’re able to accomplish these feats not only will you have perfected the single leg hip hinge but you’ll most likely have mastered your movement mechanics on a majority of exercises thereby optimizing your physiological performance and function.
Additional Notes About the 90-Deg Back Leg Position
The topic of the back leg position is typically one I’m asked the most questions about as most coaches preach a straight leg position that’s parallel to the floor wheres a teach the 90 degree knee bend. Although I’ve already highlighted my rationale above I wanted to provide several other key illustrations to help drive this topic home in terms of why the 90 degree bent leg position of the back leg is ideal in most scenarios.
When performing a single leg RDL the goal is elongation and maximal activation of the glutes and hamstrings as those are the primary muscles being worked. If we desire maximal glute and hamstring activation and lengthening then this necessitates antagonist co-contraction in the eccentric position namely the opposite muscles firing being the hip flexors and knee extensors/quads.
However, the back leg plays just as pivotal of a role during the RDL similar to how opposite arm and knee drive work together during sprinting mechanics. Essentially we're looking for reciprocal muscle activation on the opposite side of the body as this is simply the nature of the cross crawl effect or contralateral movement. Again just like the sprinting analogy in which case if one side was producing maximal hip flexion then the opposite side would be producing maximal hip extension the same holds true of the single leg RDL. When in the bottom position if the hip flexors and quads of the support leg are shortened to produce simultaneous co-contraction and lengthening of the glutes and hamstrings this would dictate that the exact opposite should be occurring in the elevated leg.
In essence the goal would be maximal shortening of the glutes and hamstrings of the elevated leg to produce maximal co-contraction and lengthening of the hip flexors and quads. This feeds right back into the contralateral knee drive cycle in which case this aforementioned activation pattern of the elevated leg would reinforce the optimal recruitment pattern of the support leg (maximal elongation of the glutes and hamstrings via maximal shortening and co-contraction of the hip flexors and quads). This cycle continues to repeat itself each repetition just like it would during repeated cycles of sprinting.
The key here is to understand that co-contraction is desired during eccentric movements but not during concentric contractions. By producing heightened levels of co-conraction during the eccentric phase this maximizes the slingshot effect were the opposing muscles (antagonists) release and produce maximal reciprocal inhibition on the subsequent concentric phase thereby optimizing power, torque, and force production.
In summary the 90 degree elevated leg position during the RDL maximizes co-contraction of the reciprocal muscle groups (during the eccentric phase) in both the elevated leg and support leg thereby maximizing power output & torque on the concentric phase in most scenarios. Additionally, during the eccentric we want maximal stretch & elongation of the glute & hamstring of the loaded/support leg. Therefore we want maximal contraction and shortening of the glute & hamstring on the opposite (elevated leg).
Another illustration that can help drive this point home is the use of the hip flexor stretch analogy. If an individual was to try to stretch their hip flexor with some form of common static stretching drill they would pull that leg into both hip extension and knee flexion (pulling the leg behind them with a bent leg position) as the combination will produce the greatest stretch in the front of that leg namely the hip flexors and secondarily to the quads. You won’t typically see an individual performing a hip flexor stretch with a straight leg position.
As previously stated during contralateral or cross-crawl simulated movements such as sprinting motions or single leg RDL's in this case, we typically want contralateral reciprocal muscle activation. In other words whatever one side is doing, the other side should be doing the exact opposite. If the goal is maximal elongation of the glutes and hamstrings in the eccentric position of the support leg then the opposite leg should be producing maximal elongation of the opposite muscles namely the hip flexors and quads. Similar to the static stretch described above, this involves a 90 degree knee bend rather than a straight leg position in most scenarios.
The Ultimate Single Leg RDL Hip Hinge
Here's one of the most complete and effective single leg RDL hip hinge exercises you can perform as you receive high levels of tension in both the top and bottom positions via loaded hip flexion.
This drill provides 8 benefits.
1. It provides one of the most effective loaded hip flexion drills you can perform something that’s quite difficult to produce with free weights particularly barbells.
2. Due to the nature of contralateral hip activation & oblique slings, the harder one hip flexor fires, the harder the opposite glute activates thus ensuring the glute & hamstring of the support leg receives maximal stimulation not only in the stretched position but also in the top contracted position.
3. These have incredible transfer to sprinting mechanics, athletic performance, & martial arts as well as any activity that involves active knee drive.
4.To balance the bar on the front leg without losing stability requires the lifter to have perfectly squared & aligned hips & torso. Any misalignment will result in the bar tilting thus causing the lifter to lose their balance. This is one of those drills that’s harder than it looks & requires nothing short of textbook execution.
5. One of the most common issues on single leg RDL’s is passive rear leg firing of the elevated leg. Instead we want aggressive activation of the glute & hamstring of that rear elevated leg by driving that heel towards the sky. Moving into aggressive hip flexion helps pre-set the hip & pre-stretch the glutes so that they fire more aggressively on the eccentric phase.
6. The hips flexors & extensors both receive complete contractions with full elongation on the eccentric & complete shortening on the concentric.
7. Firing the hip flexors at the top requires the anterior core to aggressively activate. This helps insure the low back is not excessively arched & minimizes tension to the lumbar spine throughout since the core is more likely to be fully engaged.
8. Keeping the bar square on the thigh at the top requires the lifter to fire the lats to keep the bar as close to the body as possible this dialing in posture.
Exception To the Rule: Sprinter Hip Hinge
With that said, there is an exception to this 90 degree bent leg position - sort of. It’s best illustrated during this drill shown by my athlete Ben Lai as he’s performing a unique sprinter good morning exercise that emphasizes the turnover component of sprinting as it isolates both hip extension & hip flexion with maximal activation at different phases of the movement.
This is a drill that Ben and I came up with together recently as we’d been discussing how to improve hip activation during various drills as well as sprinting performance. Since Ben has been working on his PhD in kinesiology he’s really begun to think deeper and more scientifically about various methods and ways to improve performance and muscle function.
For this drill, start off with the elevated leg in 90 degree hip flexion. As soon as you begin moving, that leg will extend into a straight leg position as this will immediately wake up the glutes to create maximal co-contraction at the onset of the eccentric phase of the movement as the harder the elevated leg’s hip extensor fires, the greater the hip flexors of the support leg (down leg) contract which in turn creates greater eccentric elongation and co-contraction of the hip extensors in the support leg (i.e. more glute and hamstring activation). This is the main difference compared to the above examples as we initiate the movement with a straight leg position in the elevated leg as this produces glute activation and co-contraction sooner.
Completing the last portion of the eccentric by snapping the elevated leg into 90 deg knee flexion further enhances posterior chain activation due to contralateral activation patterns in reciprocal muscle groups of opposing limbs described above. With that said this is a very advanced movement & not something I would recommend until you’ve mastered the basic single leg hip hinge. The single leg hip hinge with a 90 deg bent leg is my go-to variation for performing RDL’s and good mornings in the past. However, periodically including a straight leg position in the back leg to isolate hip extension could be a beneficial drill to include to isolate the glutes and for transferring into this sprinter good morning.